AI-ML-Classifiers
AI Multitask Classifiers: From Objects to Emotions
Created by Son Nguyen in 2024, this repository contains Python scripts for various AI-powered classifiers. These classifiers can be used for object detection, face detection, character recognition, and more. The classifiers are built using popular deep learning frameworks such as OpenCV, TensorFlow, and PyTorch.
This repository contains 9 subdirectories for the 9 classifiers:
| Classifier | Subdirectory Name |
|---|---|
| Vehicle Classification | Vehicle-Classification |
| Human Face Classification | Human-Face-Classification |
| Mood Classification | Mood-Classification |
| Flower Classification | Flowers-Classification |
| Object Classification | Object-Classification |
| Character Recognition | Character-Recognition |
| Animal Classification | Animals-Classification |
| Speech Recognition | Speech-Recognition |
| Sentiment Analysis | Sentiment-Analysis |
Detailed information about each classifier can be found below.
What’s even more interesting is that all these classifiers can use your webcam for live testing, video files, or image files!
Please read this README file carefully to understand how to use each classifier and how to run the main script to choose and run any of the classifiers. Happy classifying! 🚀
Table of Contents
- Before You Begin
- Browser Demo
- Main Script - Entry Point
- Flask Web App
- Vehicle Classification
- Human Face Classification
- Mood Classification
- Flower Classification
- Object Classification
- Character Classification (OCR)
- Animal Classification
- Speech Recognition
- Special: Self-Trained Sentiment Classifier
- Contact Information
- Future Work
- License
Before You Begin
Before you begin, ensure you have the following installed on your machine (run pip install <requirement_name> for each dependency or pip install -r requirements.txt to install all the required packages):
- Python 3.12 or higher (download from the official Python website)
- OpenCV
- TensorFlow
- PyTorch
- NumPy
- Matplotlib
- Tesseract OCR
- Pytesseract
- SpeechRecognition
- MoviePy
- PyDub
- PyAudio
- Scikit-learn
- Pandas
- NLTK
- tqdm
- Joblib
- YoloV3
- jQuery
- Git LFS (for downloading large model weights files)
- A webcam (if you want to use live testing)
- A microphone (if you want to use speech recognition)
- A video file or image file for testing the classifiers
- A stable internet connection (for downloading model weights and dependencies)
- A working speaker or headphones (for speech recognition)
- Additionally, if you would like to train the sentiment classifier, you will need:
- A machine with sufficient computational resources
- The large training data files (e.g.
training.1600000.processed.noemoticon.csv) or the small dataset generated from it (small_dataset.csv)
- And if you would like to use the website version of this app, you will also need to install
FlaskandFlask-SocketIOas well.
It is also recommended to use a virtual environment to use these classifiers. You can create a virtual environment using venv or conda:
python -m venv env
source env/bin/activate
[!IMPORTANT] Note: If you are unable to use Git LFS, you can download the necessary files from my Google Drive:
Please feel free to let me know if you encounter any problems with any of the files, or with getting started with the project!
[!CAUTION] Update: There has been a known issue with Git LFS bandwidth, which may interrupt your Git cloning experience. Please use the Google Drive links above if you encounter any issues with Git LFS. I apologize for the inconvenience.
Browser Demo
Try it in your browser (no install needed!): https://ai-classifiers-demo.vercel.app/
This live demo showcases three tasks:
- Object Classification/Detection — identify common objects from your webcam or an uploaded image.
- Face Detection — locate faces with bounding boxes.
- Character Recognition (OCR) — extract text from images.
Quick start
- Open the link above (Chromium-based browser recommended).
- Choose Start Camera (grant permission) or Upload Image.
- Pick a task and click Run Detection.
Instructions / Troubleshooting
- Use a Chromium-based browser. This demo uses the Shape Detection API.
- Barcode is commonly available by default. Face and Text may require enabling experimental features depending on your build.
- If something is unavailable, try enabling:
chrome://flags/#enable-experimental-web-platform-features, restart the browser, then refresh this page. - Camera requires a secure origin (https:// or localhost).
- Loading an image by URL requires the image server to allow CORS; otherwise you’ll see a SecurityError.
- Detectors are asynchronous and not guaranteed to be real-time. Prefer manual snapshots or occasional checks.
Main Script
If you prefer not to navigate through the subdirectories, you can run the main script main.py to choose and run any of the classifiers. The main script will ask you to choose a classifier from the list of available classifiers. You can then select a classifier and run it.
To run the main script, use the following command:
python main.py
The main script will display a list of available classifiers. Enter the number corresponding to the classifier you want to run. The script will then run the selected classifier.
To stop the script, press Q, ESC, or otherwise close the window.
Alternatively, you can also run the individual scripts in each subdirectory below to run the classifiers directly.
Flask Web App
If you would like to use the interactive website version of this app, you can run the Flask web app. The web app allows you to use the classifiers through a web interface. You can choose a classifier and the app will run the selected classifier.
To run the Flask web app, use the following command:
python app.py
The web app will start running on http://127.0.0.1:5000/. Open this URL in your web browser to access the web app. You can then choose a classifier from the list of available classifiers and run it. A pop-up window will display the output of the classifier - so be sure to allow pop-ups in your browser.
Here is what it looks like:

[!NOTE] Note that the app has also been deployed to Heroku at this link. However, due to changes in Heroku’s free tier regarding available Dynos (and I’m a broke college student), the app may not work as expected. If you encounter any issues, please run the app locally using the instructions above.
Vehicle Classification
Files Included
coco.names: Class names used for vehicle detection.traffic.mp4: Sample video for vehicle detection.india.jpg: Sample image for vehicle detection.yolov3.cfg: YOLOv3 model configuration file.yolov3.weights: Pre-trained YOLOv3 model weights.vehicle_detection.py: Python script for vehicle detection and classification.
Getting Started
-
Clone the Repository
git clone https://github.com/hoangsonww/AI-Classification.git cd AI-Classification/Vehicle-Classification -
Download Model Weights Download the pre-trained YOLOv3 model weights (
yolov3.weights) from the official YOLO website or another trusted source and place it in theVehicle-Classificationdirectory. Or you can use Git LFS or my Google Drive links to download the necessary files. -
Install Dependencies Install the required Python dependencies.
pip install -r requirements.txt -
Install and Pull Git LFS Install Git LFS by following the instructions on the official Git LFS website. Then, pull the model weights using Git LFS.
git lfs install
git lfs pull
Alternatively, you can download the weights file from the official YOLO website and place it in the
Vehicle-Classificationdirectory. However, using Git LFS is recommended.This is crucial for pulling the large model weights file
yolov3.weights. Without Git LFS, the weights file may not be downloaded correctly and the script may not work as expected.If you still encounter problems with Git LFS, you can download the weights file from my Google Drive, which is publicly available here.
-
Run Vehicle Detection
python vehicle_detection.py
You will then be asked to choose your input type (image, video, or webcam). Enter image to classify the vehicles in the sample video provided (traffic.mp4), or enter video to classify vehicles in a video file. You can also use your webcam for live testing.
All our classifiers will only stop when you press Q, ESC, or otherwise close the window.
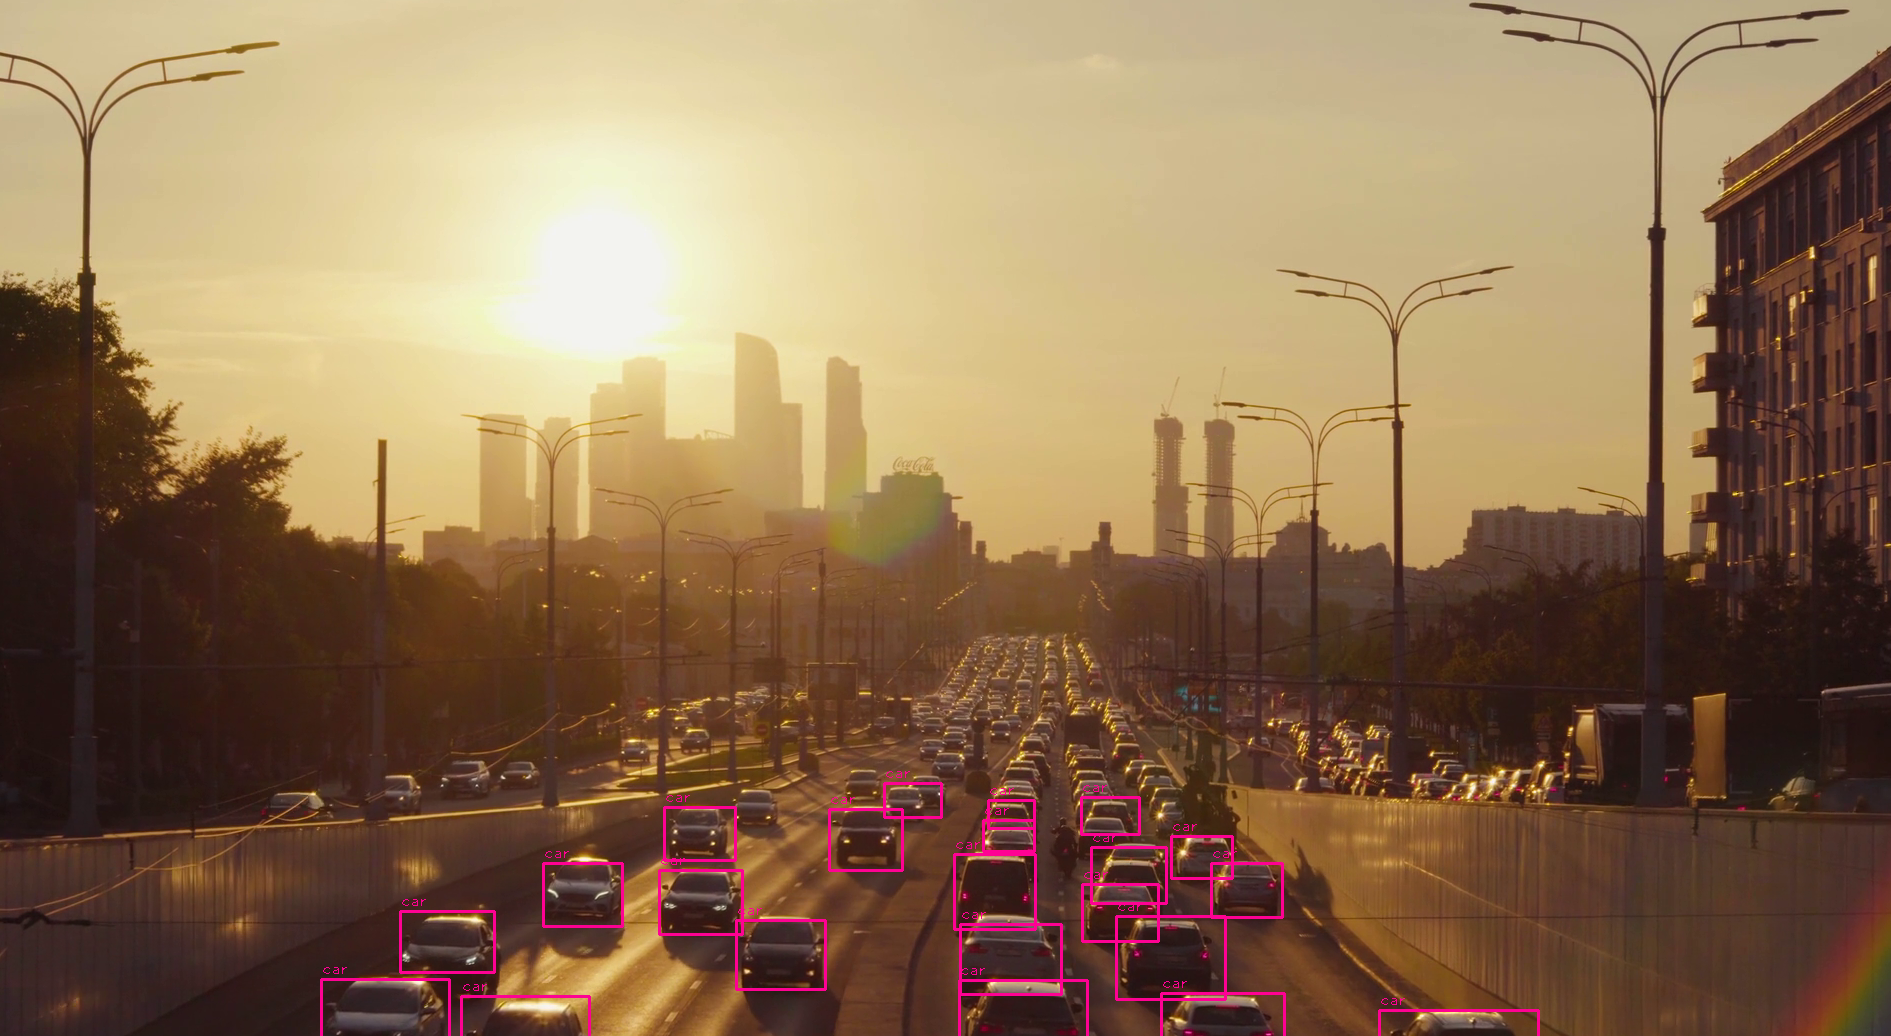
Output
The output video will display the detected vehicles along with their class labels. The class labels are based on the COCO dataset, which includes various classes such as car, truck, bus, motorcycle, and bicycle.
Example output:
Face Classification
Files Included
deploy.prototxt: Model configuration file for the face detector.res10_300x300_ssd_iter_140000.caffemodel: Pre-trained model weights for face detection.age_deploy.prototxt: Model configuration file for age prediction.age_net.caffemodel: Pre-trained model weights for age prediction.gender_deploy.prototxt: Model configuration file for gender prediction.gender_net.caffemodel: Pre-trained model weights for gender prediction.faces_classification.py: Python script for face detection, age, and gender classification.woman-30.mp4: Sample video for face classificationman.jpg: Sample image for face classification.
Getting Started
-
Clone the Repository
git clone https://github.com/hoangsonww/AI-Classification.git cd AI-Classification/Face-Classification -
Download Model Weights: Ensure you have the model weights (
res10_300x300_ssd_iter_140000.caffemodel,age_net.caffemodel,gender_net.caffemodel) in theHuman-Face-Classificationdirectory. -
Install Dependencies: Install the required Python dependencies.
pip install -r requirements.txt -
Run Face Classification: Execute the face_classification.py script.
python face_classification.py
You will then be asked to choose your input type (image, video, or webcam). Enter image to classify the faces in the sample image provided (woman-30.mp4), or enter video to classify faces in a video file. You can also use your webcam for live testing.
All our classifiers will only stop when you press Q, ESC, or otherwise close the window.
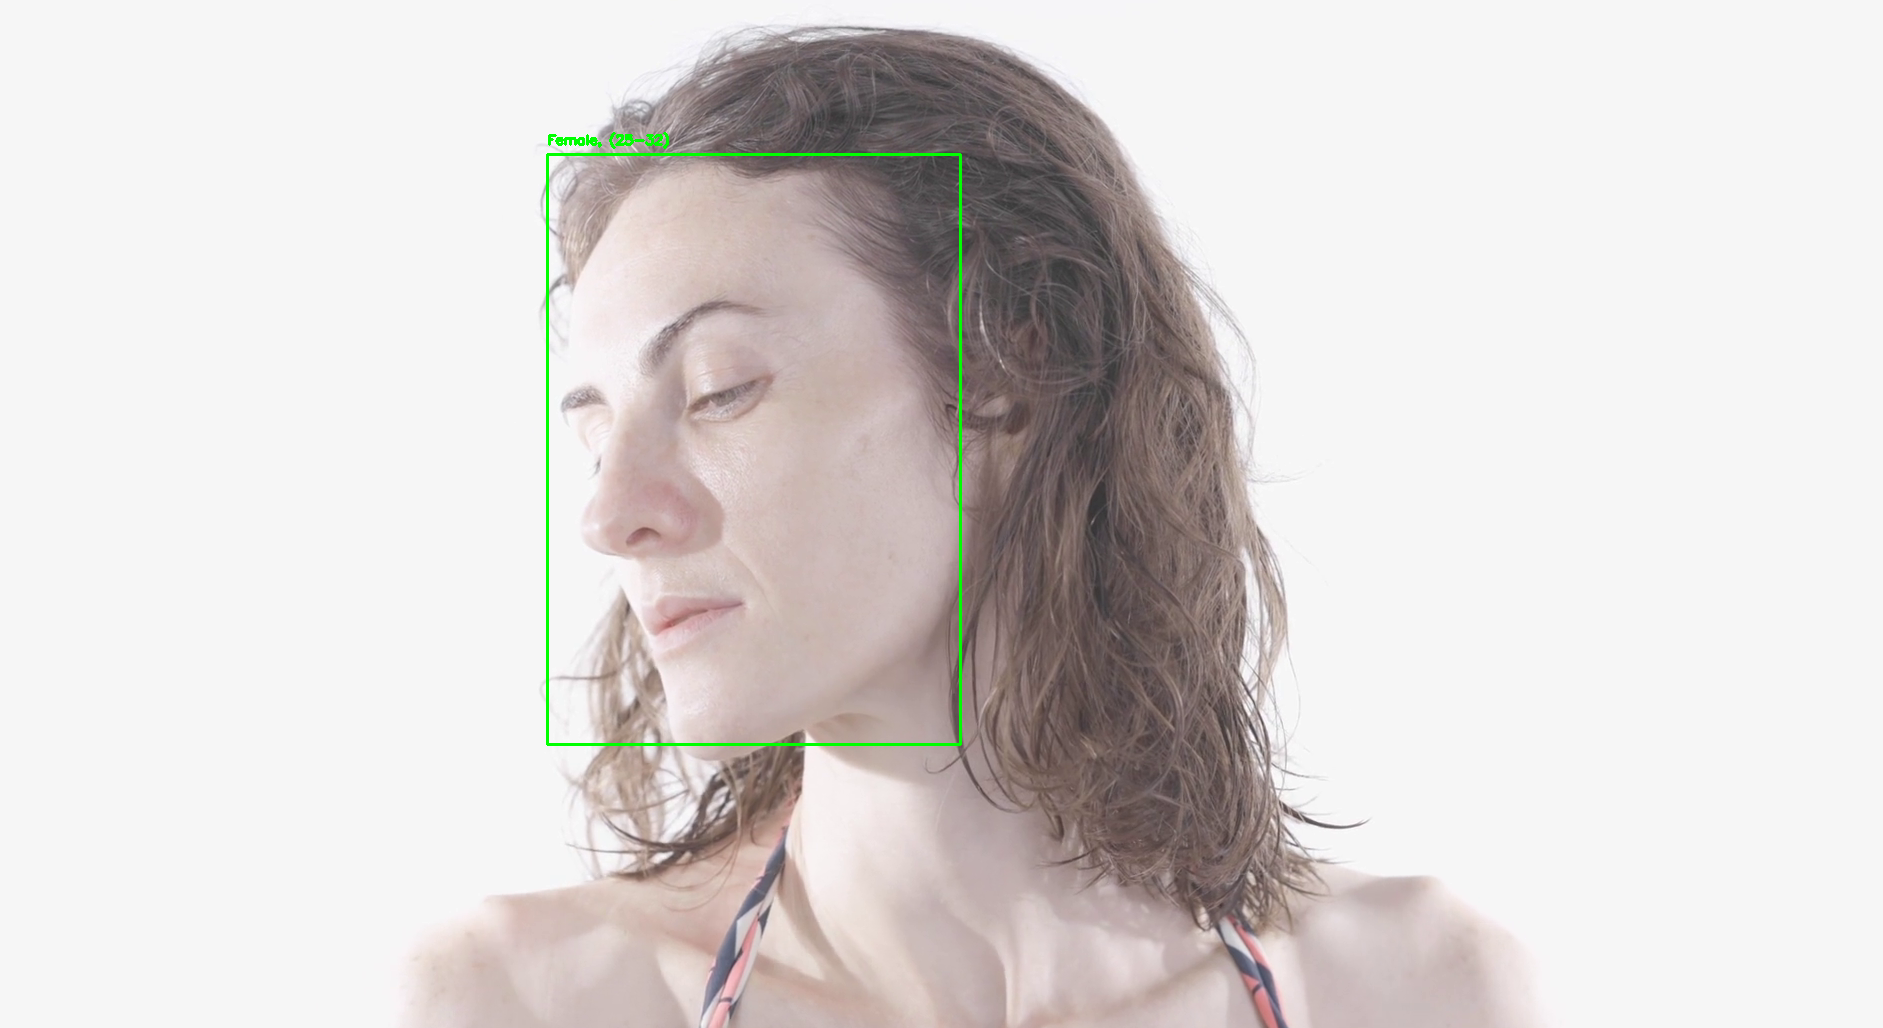
Output
The output will be a video displaying the detected faces along with their estimated age and gender.
Example output:
Mood Classification
Files Included
mood_classifier.py: Python script for mood classification.angry.mp4: Sample video for mood classification (angry).surprised.jpg: Sample image for mood classification (surprised).
Getting Started
- Clone the Repository
git clone cd AI-Classification/Mood-Classification - Install Dependencies
Install the required Python dependencies.
pip install -r requirements.txt - Run Mood Classification
python mood_classifier.py
You will then be asked to choose your input type (image, video, or webcam). Enter image to classify the mood in the sample image provided (surprised.jpg), or enter video to classify the mood in a video file. You can also use your webcam for live testing.
The script will then display the detected mood in the image, video, or webcam stream and in the console.
All our classifiers will only stop when you press Q, ESC, or otherwise close the window.
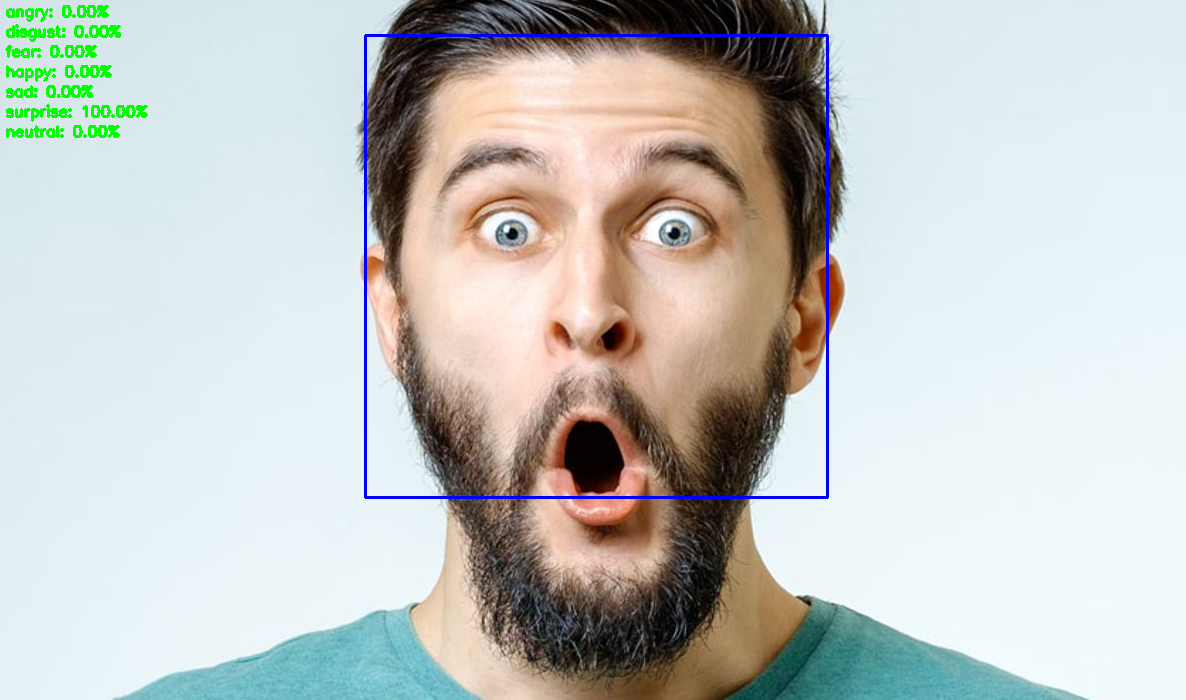
Output
The output will be displayed the detected mood in the image, video, or webcam stream and in the console.
Example output:
Character Classification
Files Included
ocr.py: Python script for character classification.OIP.jpg: Sample JPEG image for character classification.chars.jpg: Sample JPEG image for character classification.chars.mp4: Sample video for character classification.letters.mp4: Sample video for character classification.
Getting Started
- Clone the Repository
git clone cd AI-Classification/Character-Recognition - Install the required Python dependencies.
pip install -r requirements.txt - Install Tessaract OCR
- For Windows: Download and install the Tesseract OCR executable from the official Tesseract OCR website.
- For Linux: Install Tesseract OCR using the package manager.
sudo apt-get install tesseract-ocr - For macOS: Install Tesseract OCR using Homebrew.
brew install tesseract - This is required for the OCR functionality to work. Also, when you install, note down the installation path of the Tesseract OCR executable. Replace the path in the
pytesseract.pytesseract.tesseract_cmdvariable in theocr.pyscript with yours. - For example, if you installed Tesseract OCR in the default location on Windows, the path would be:
pytesseract.pytesseract.tesseract_cmd = r'C:\Program Files\Tesseract-OCR\tesseract.exe'
-
Run Character Classification
python ocr.pyYou will then be asked to choose your input type (image, video, or webcam). Enter
imageto classify the characters in the sample image provided (OIP.jpg), or entervideoto classify characters in a video file. You can also use your webcam for live testing.image
The script will then display the detected characters in the image, video, or webcam stream.
All our classifiers will only stop when you press Q, ESC, or otherwise close the window.
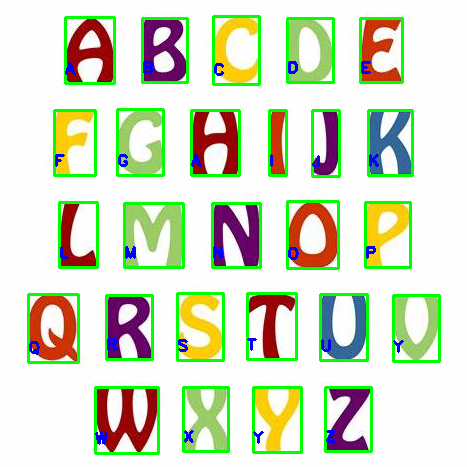
Output
The output will display the class labels of the characters detected in the image along with the confidence scores.
Example output:
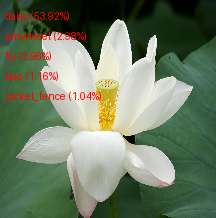
Flower Classification
Files Included
flower_classification.py: Python script for flower classification.daisy.jpg: Sample JPEG image for flower classification (Daisy).marigold.jpg: Sample JPEG image for flower classification (Marigold).rose.mp4: Sample video for flower classification (Rose).
Getting Started
-
Clone the Repository
git clone https://github.com/hoangsonww/AI-Classification.git cd AI-Classification/Flowers-Classification -
Install Dependencies Install the required Python dependencies.
pip install -r requirements.txt -
Run Object Classification
python flower_classification.py
You will then be asked to choose your input type (image, video, or webcam). Enter image to classify the flowers in the sample image provided (daisy.jpg), or enter video to classify flowers in a video file. You can also use your webcam for live testing.
All our classifiers will only stop when you press Q, ESC, or otherwise close the window.
Output
The output will display the class label of the flower detected in the image along with the confidence score.
Example output: Here are the sample image of Daisy flowers.
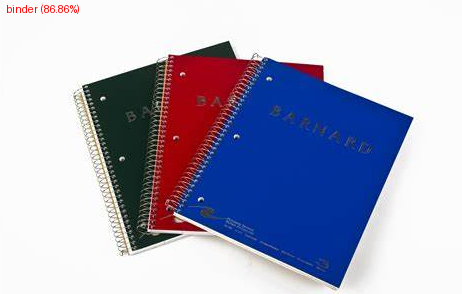
Object Classification
Files Included
object_classification.py: Python script for object classification.objects.jpg: Sample JPEG image for object classification.objects.png: Sample PNG image for object classification.balls.mp4: Sample video for object classification.OIP.jpg: Sample image for object classification.
Getting Started
-
Clone the Repository
git clone https://github.com/hoangsonww/AI-Classification.git cd AI-Classification/object_classification -
Install Dependencies Install the required Python dependencies.
pip install -r requirements.txt -
Run Object Classification
python object_classification.py
You will then be asked to choose your input type (image, video, or webcam). Enter image to classify the objects in the sample image provided (objects.jpg), or enter video to classify objects in a video file. You can also use your webcam for live testing.
Feel free to change the paths and other parameters in the script to suit your needs.
[!TIP] All our classifiers will only stop when you press
Q,ESC, or otherwise close the window.
Output
The output will display the class labels of the objects detected in the image along with the confidence scores. Or, if you choose to use your webcam, the output will display the class labels of the objects detected in the video stream. If you choose to use a video file, the output will be a video displaying the detected objects along with their class labels.
Example output:
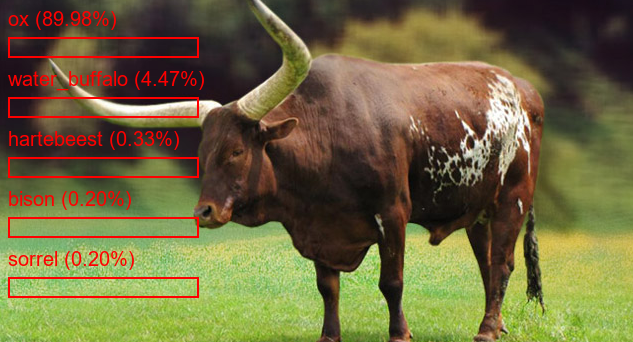
Animal Classification
Files Included
animal_classification.py: Python script for animal classification.cow.jpg: Sample JPEG image for animal classification (Cow).ox.jpg: Sample JPEG image for animal classification (Ox).
Getting Started
-
Clone the Repository
git clone https://github.com/hoangsonww/AI-Classification.git cd AI-Classification/Animals-Classification -
Install Dependencies Install the required Python dependencies.
pip install -r requirements.txt -
Run Object Classification
python animal_classification.py
The script will then ask you to choose your input type (image, video, or webcam). Enter image to classify the animals in the sample image provided (cow.jpg), or enter video to classify animals in a video file. You can also use your webcam for live testing.
All our classifiers will only stop when you press Q, ESC, or otherwise close the window.
Output
The output will display the class labels of the animals detected in the image along with the confidence scores.
Example output:
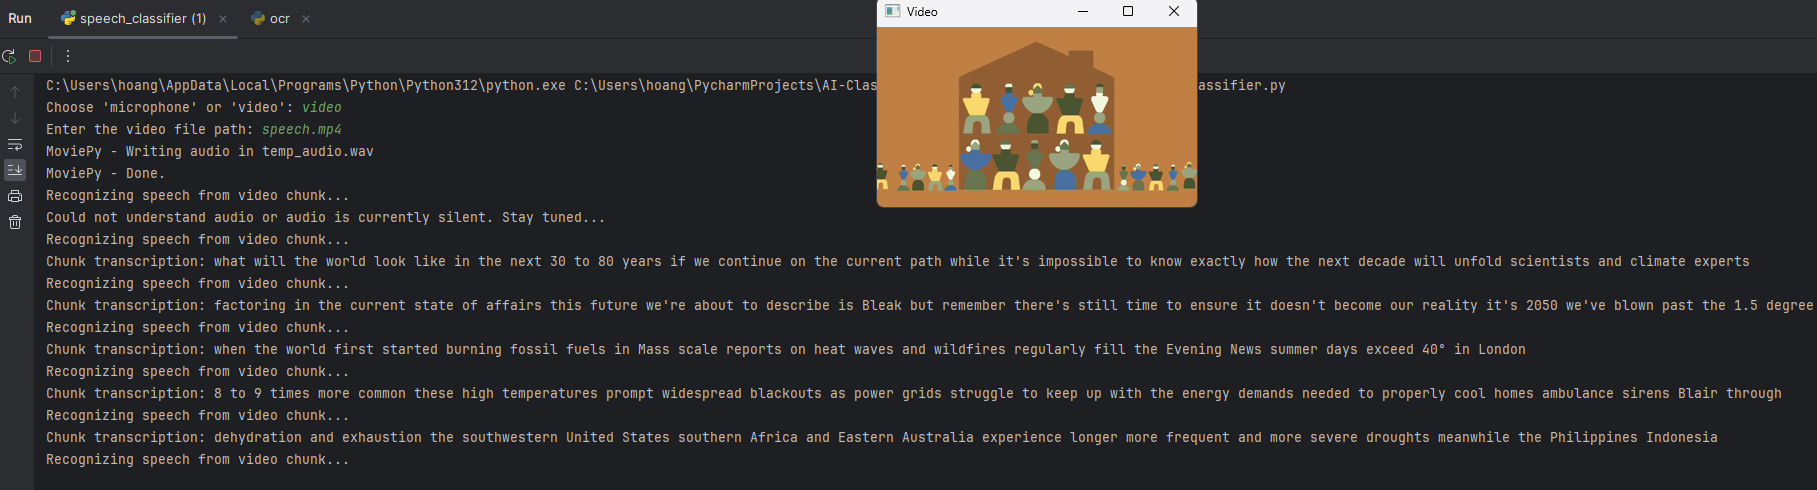
Speech Recognition
Files Included
speech_classifier.py: Python script for speech recognition.speech.mp4: Sample video file for speech recognition in a video context.temp_audio.wav: Temp audio file (used by our AI) for speech recognition.
Getting Started
-
Clone the Repository
git clone https://github.com/hoangsonww/AI-Classification.git cd AI-Classification/Speech-Recognition - Install Dependencies
Install the required Python dependencies.
pip install -r requirements.txt - Run Speech Recognition
python speech_classifier.py
You will then be asked to choose your preferred input method (microphone or video). Enter microphone to use your microphone for live speech recognition, or enter video to use a video file for speech recognition.
Output
You will see the output of the speech recognition process in the console. The script will display the recognized speech from the audio input. The audio is processed in chunks and recognized in real-time. All our classifiers will stop when you press Q, ESC, or otherwise close the window.
Example output:
Special: Self-Trained Sentiment Classifier
In addition to the other pre-trained classifiers, this repository includes a special sentiment classifier that you can train yourself. The sentiment classifier is trained on a large dataset of tweets and can classify the sentiment of a sentence as positive, negative, or neutral. This is excellent for educational purposes and for understanding how sentiment analysis works.
Files Included
sentiment_classifier.py: Python script for sentiment classification.train_model.py: Python script for training the sentiment classifier, which includes data preprocessing, model training, and evaluation.sentiment_model.pkl: Trained sentiment classifier model.vectorizer.pkl: Trained vectorizer for the sentiment classifier.training.1600000.processed.noemoticon.csv: Training data for the sentiment classifier (Large file).testdata.manual.2009.06.14.csv: Test data for the sentiment classifier.test.csv: Sample test data for the sentiment classifier.train.csv: Sample training data for the sentiment classifier.generate_small_dataset.py: Python script for generating a small dataset from the large training data.small_dataset.csv: Small dataset generated from the large training data.
Getting Started
- Clone the Repository
git clone cd AI-Classification/Sentiment-Analysis - Install Dependencies:
Install the required Python dependencies.
pip install scikit-learn pandas numpy nltk tqdm joblib -
Pull the Large Training Data: The sentiment classifier is trained on a large dataset of tweets. The large training data is stored in a CSV file named
training.1600000.processed.noemoticon.csv. This file is stored using Git LFS due to its large size. To pull the large training data, use the following command:git lfs install git lfs pull- Alternatively, you can download the large training data from the Sentiment140 dataset website and place it in the
Sentiment-Classifierdirectory. However, using Git LFS is recommended. - If you do not have Git LFS installed, remember to install it first. You can find instructions on how to install Git LFS on the official Git LFS website.
- If you still encounter problems, you can download the large training data file from my Google Drive, which is publicly available here:
- training.1600000.processed.noemoticon.csv
- test.csv
- train.csv
- small_dataset.csv
- If you need any other files, please let me know.
- Alternatively, you can download the large training data from the Sentiment140 dataset website and place it in the
-
Train the Sentiment Classifier Run the
train_model.pyscript to train the sentiment classifier.python train_model.py- When running the script, you will be asked to choose the dataset size (small or large). Enter
smallto use the small dataset orlargeto use the large dataset. The script will then preprocess the training data, train the sentiment classifier, and save the trained model and vectorizer to disk. - However, if you choose
small, the script will use the small dataset provided in the repository. In order to use it, be sure to run thegenerate_small_dataset.pyscript first to generate the small dataset from the large training data.
python generate_small_dataset.py - When running the script, you will be asked to choose the dataset size (small or large). Enter
[!CAUTION]
- Note: Training the sentiment classifier on the large dataset may take a long time and require significant computational resources. However, it is recommended since it provides better model accuracy.
- Once again, if you are patient and have a good machine, you are encouraged use the large dataset to get a higher accuracy. Otherwise, use the small dataset for faster training.
- This script will then preprocess the training data, train the sentiment classifier, and save the trained model and vectorizer to disk.
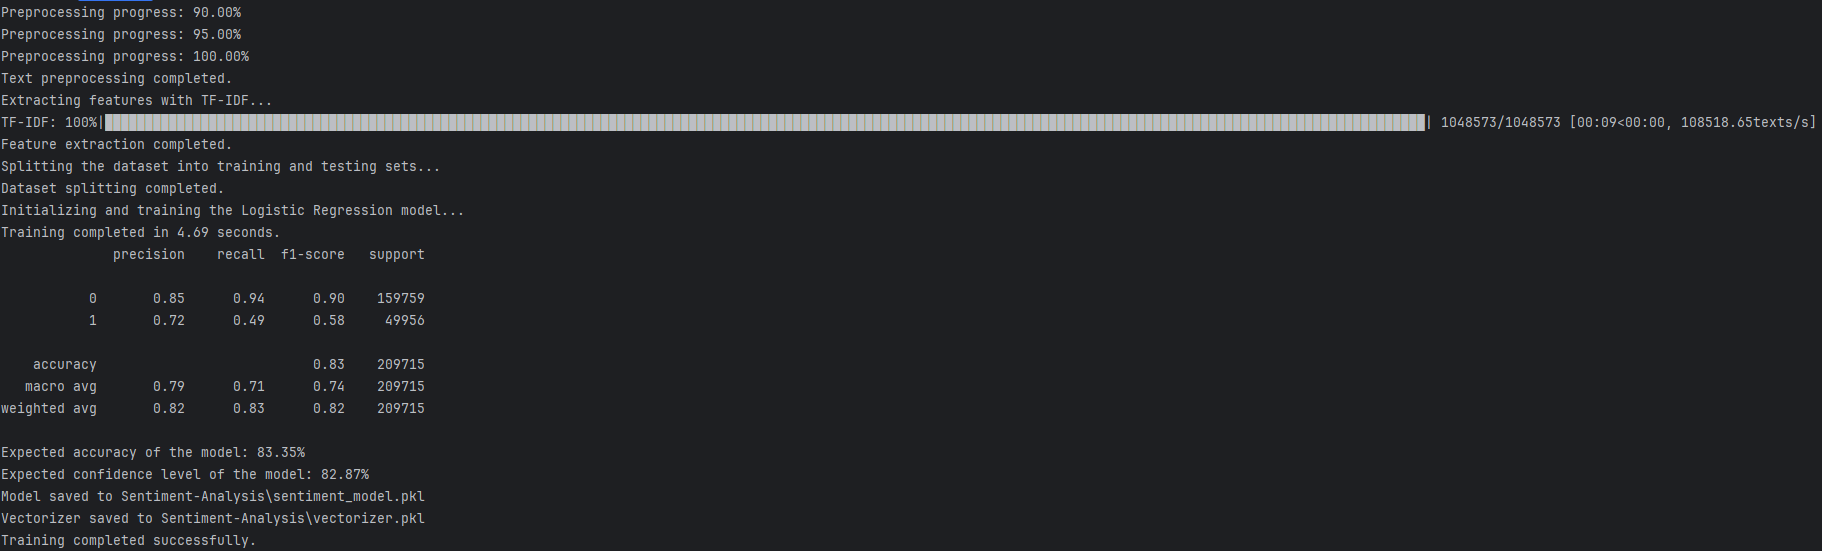
- Additionally, it will output the expected accuracy, F1 score, and expected confidence level of the sentiment classifier. The higher these statistics are, the better the sentiment classifier will perform. Of course, this is highly dependent on the training dataset size and quality. Feel free to experiment with the training data and parameters to improve the sentiment classifier’s performance.
- Run Sentiment Classification
python sentiment_classifier.pyYou will then be asked to enter a sentence for sentiment classification. Enter a sentence, and the script will classify the sentiment of the sentence as positive, negative, or neutral, with a level of confidence.
Output
The output will display the sentiment classification of the input sentence. The sentiment classifier will classify the sentiment as positive, negative, or neutral.
Training Output Example:
Classification Output Example:

Feel free to experiment with the sentiment classifier and test it with your own sentences and explore how powerful sentiment analysis can be!
Containerization
If you would like to containerize this application, you can use Docker to create a container image. The Dockerfile is included in the repository for this purpose. To build the Docker image, use the following command:
docker build -t ai-multitask-classifiers .
This command will build a Docker image named ai-multitask-classifiers based on the Dockerfile in the repository. You can then run the Docker container using the following command:
docker run -p 5000:5000 ai-multitask-classifiers
This command will run the Docker container and expose port 5000 for the Flask web app. You can access the web app by visiting http://127.0.0.1:500.
[!IMPORTANT] Before containerizing the application, ensure you have Docker installed on your machine. You can download Docker from the official Docker website. Then, ensure that Docker Desktop is running on your machine before building and running the Docker container.
Contact Information
For any questions or issues, please refer to the contact information below:
- GitHub: Son Nguyen
- Email: info@movie-verse.com
- LinkedIn: Son Nguyen
Future Work
- Add more classifiers for various tasks such as emotion recognition, sentiment analysis, and more.
- Refine existing classifiers and improve their accuracy and performance.
- Add more sample images and videos for testing the classifiers.
License
This project is licensed under the MIT License - see the LICENSE file for details.
Live Information Website
Feel free to visit the live demo and information website here: https://ai-ml-information-website.vercel.app/.
It is a simple website that provides information about ALL the classifiers in this repository.
Created with ❤️ by Son Nguyen in 2024.
Thank you so much for visiting! 🚀